Much of what makes a video game stand out to me are the small details - moments that might not get a second conscious thought but breathe life into the world being created. In this post I want to dig a little deeper into the technical side of how puddles work in my game, hiraeth, which is a detail I like both in its execution and for what I learned in figuring out how to bring them to fruition. This ended up being the hardest problem I have had so solve so far in my development journey. "Hardness" here is being used purely in a subjective sense, and the difficulty for me arose mainly due to the number of foreign concepts I had to grapple with in order to get things to work. I assume no knowledge about graphics programming here, as I had no prior experience when I started, but there will still be some terms that may be unfamiliar. (There will be an appendix with some more concrete implementation details for those interested.)
Puddles
In hiraeth's prologue, it is raining. The ground was looking quite bare apart from some tufts of grass, so it seemed only natural that I would add some puddles of rainwater to spruce up the environment. I knew I wanted these to have two properties:
- the players reflection should appear in the puddle
- puddles should be able to be any arbitrary shape
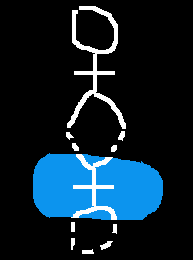
The dashed line in the reflection shouldn't be visible
The first step was relatively straightforward: when the player is close enough to a puddle such that they should be reflected, draw a copy of the player texture that is reflected in the x axis, joined to the player at their feet (see appendix 1). The bit that ends up being quite difficult to do is to not draw bits of that texture that don't overlap with the puddle.
My idea when I knew no better
My first thought for how to not show the parts of the reflection that don't overlap with the puddle was for each puddle to be a large texture with a hole in it - so I would first draw a blue square for the puddle, then the reflected player to the screen (with a bit of transparency to make it "reflection-y"), and finally draw the puddle over the top making a reflection sandwich:

This would work, but has a glaring problem - it isn't portable. Every time I want to have a puddle in the game, I would need to model the top hole-y layer to blend in seamlessly with the scenery around it, and every time I then decided I wanted to adjust anything, I would have to redraw the puddle textures. A completely untenable approach. Being entirely new to graphics programming, it was hard to know what to Google in order to look for a better, adaptable solution. To my mind the problem seemed similar to set operations - set intersections, maybe? The word "mask" felt familiar in this context. I ended up brute forcing the problem until eventually stumbled upon what I was looking for - Stencil Testing.
Stencil Testing
The technique I needed to use ended up being very appropriately named, even if I couldn't make the connection myself. In essence, the stencil would work like this: we cover the draw area with a cut-out layer that I can draw my reflection over, then remove to leave on the underlying surface only the parts that fell within the holes.

This is not something you can do out-of-the-box with just the functions provided by Raylib (the game engine I am working with), but instead requires using the interfaces that Raylib itself uses to render graphics. The tool in question is called OpenGL (Open Graphics Library)1, which is an API (or, set of functions for telling your computer what to do) for graphics rendering that has been implemented across many operating systems and platforms. That means that the code I write on my MacBook that uses OpenGL can also run on your Windows PC, even though the way the OS executes those functions may be different.
In OpenGL, the part of the rendering pipeline that can do what we want for puddles is called the Stencil Test - "test" because we are testing whether or not to include each pixel of what is being drawn. We'll walk through a high-level overview of how Stencil Testing works.
First turn on Stencil Test "mode". Within this context, we first turn on Stencil Mask "mode" - here any pixel that we attempt to draw, instead of it appearing on the screen, gets turned into a bitmask - an imaginary overlay of 1s and 0s, where the 1s appear anywhere we tried to draw a pixel, and 0s appear otherwise.
 -----------------------        -----------------------
|     --                |      |00000111100000000000000|
|    |  |               | -->  |00000111100000000000000|
|     --                |      |00000111100000000000000|
|                       |      |00000000000000000000000|
 -----------------------        -----------------------
When we leave the Stencil Mask context but are still within the Stencil Test context, the pixels of anything we draw that fall under a 1 gets kept, and any pixel that falls under a 0 gets discarded. In other words, the bitmask acts as our stencil. We can then turn off Stencil Testing (see appendix 2 for far more detail)2.
Let's see this in practice in the game:
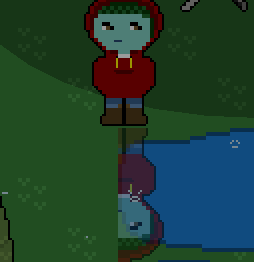
So that's not quite right. The puddle texture is correctly cutting off the reflection at its bounding rectangle, but I also need the bits that aren't over the puddle-y pixels to be excluded too.
When a pixel is drawn to the screen, there are four numbers that determine its appearance - three colour values: red, green, blue, and one value called alpha, which determines its transparency. Any artwork for the game that isn't perfectly rectangular will have pixels where the alpha value is 0, i.e. it is completely see-through. But, importantly, the texture itself is perfectly rectangular, as it is basically just a png being loaded onto the screen. The stencil process as we have outlined it above cares not for whether a pixel is see-through when producing the bitmask, it just cares whether there is something there.
I realised this was the issue when I tried replacing the puddle texture with one of Raylib's built-in ellipse's - when Raylib draws an ellipse it only draws pixels where the ellipse is defined - so no transparent pixels around the edge.
In older versions of OpenGL there was a way to exclude or include pixels based on their alpha values - unsurprisingly this is called Alpha Testing. I spent a long time banging my head against trying to set up the Alpha Test before I discovered that the feature simply didn't exist in the version of OpenGL that my computer uses. There was one final concept that I needed to get to grips with before my wet dreams could come true - shaders.
Shaders
Its always a nice feeling when you Google a specific question and you find someone has already asked exactly the same thing. I searched "opengl alpha testing replacement" and Stack Overflow came to my rescue in the first result. While I appreciate user Colonel Thirty Two's response for pointing me most of the way, I still had some work to do to understand exactly what was needed. I could see that once I had all the baseline knowledge it would indeed be "very easy to implement", but reaching that initial understanding was still a battle left to be won.
If you have, or seen someone else, play a modded version of a game, you might have heard the term "shader" as a tool that doesn't change any gameplay elements, but alters the way the game appears. And that is essentially what they are - a shader is a function that is applied to a graphical model before it is drawn, in order to alter its appearance3. In 3D graphics, they are commonly used for lighting effects and (surprise, surprise) shading. We are interested in the world of 2D shaders, in particular pixel shaders - functions applied to each individual pixel of the texture before it is drawn.
When working with OpenGL, shaders need to be written in their own programming language, GLSL, (OpenGL Shading Language) which is similar to C in syntax. Learning enough of this new language in order to adapt the stackoverflow answer was non-trivial, but things quickly fell into place once I had written it correctly.
What I needed to do was apply a shader to the texture used to create the bitmask - one that discards any pixels where the alpha value is 0 before we try to draw it.
   texture for bitmask
 ------           ------
|111100| apply   |1111  |
|011110| ------> | 1111 |
|000111| shader  |   111|
 ------           ------
pixels with alpha=0 get thrown out

we can apply a bitmask of arbitrary shape to the screen
 -----------------------
|00001111000000000000000|
|00000111100000000000000|
|00000011110000000000000|
|00000000000000000000000|
 -----------------------
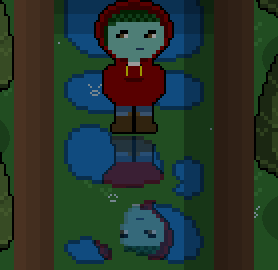
Applying this shader to my puddle pipeline (see appendix 3) at last gave me my desired result of arbitrarily shaped puddles:
Reflecting on the experience
(You: Ha ha, I see what you did there). I am really happy with how this feature turned out, and even though I found the process frustrating at times, the amount I learned was also very satisfying. The world of OpenGL does feel like one of those technologies where its hard to do even a relatively easy task without having quite a foundational understanding of lots of concepts already. In lots of ways it is reminiscent of being a junior developer again - all the excitement of new things to work on, learn and improve at, versus the frustration of having an easy to state problem that you can see more experienced folk find quite trivial, but you find utterly insurmountable.
When I wrote my original implementation I feel like I stumbled into the solution without really knowing how I got there, and it has been a very informative experience to write about it and try to unpick each step. I hope that by sharing the process others can learn something, even if they never do any graphics programming in their life. I think seeing other peoples' thought-processes and problem-solving, regardless of the medium, help us develop and hone our own approaches to tackling complex issues.
Appendix
1 - How to draw a reflection
We imagine a box extending upwards from the top of the bounding box of each puddle, that is the height of the bounding box of the player texture and the entire width of the puddle texture. If the player texture ever intersects with this box, then we know on that frame the reflection should be drawn. This would be equivalent to pinning a like box to the bottom edge of the player texture and checking whether that ever intersects with any puddle texture.
 -------------
|             | ^
| reflection  | height of
|    check    | player
|     box     | texture
|             | v
 -------------
|             |
|    puddle   |
|             |
 -------------
The intersection of two boxes can be done with just four checks:
a.leftMostX < b.rightMostX &&
  a.rightMostX > b.leftMostX &&
  a.upmostY < b.downmostY &&
  a.downmostY > b.upmostY
In Raylib one way to draw a texture is with the function:
DrawTexturePro(
    texture, //the loaded texture
    source, // a rectangle denoting an area of the texture to be drawn
    dest, // a rectangle denoting an area of the screen that will be drawn on
    origin, // a vector denoting where in the dest rectangle to drawn from
    ... // some other args not relevant here
)
We use a single texture containing all of the sprites for the player, so when they move around we move the source rectangle to a different part of the texture to animate their movement.
In order to draw the reflection of the player, the texture will be the same as that we are using for the player currently. The dest will be a rectangle similar to that of the dest rectangle for the player texture except translated vertically by its height. The origin will always be (0, 0) . In order to reflect the drawing, we can use the same source rectangle as for the player, except we give it a negative height, e.g. if the player has source Rectangle(0, 0, 50, 50), the source for the reflection will be Rectangle(0, 0, 50, -50).
     texture                               screen
 ----------------           ---------------------------------------
|  source rect   |         |                                       |
|      ---       |         |        ---                            |
|     |   |      | ---->   |       |   | player dest rect          |  |
|      ---       |         |       .---                            |  | +y
|                |         |       |   | reflection dest rect      |  v
|                |         |        ---                            |
|                |         |                                       |
 ---------------            ---------------------------------------
                             . = reflection origin (relative to the dest rect)

negative height/width inverts the source rectangle
2 - Stencil testing using OpenGL C bindings
You can learn more about Stencil Testing here. The code I use in my implementation is adapted from this feature request in Raylib. I use bindings to glad for the OpenGL API. Here it my version in Scala:
def stencilTest(f: () => Unit): Unit = {
  rlDrawRenderBatchActive()
  glEnable(GL_STENCIL_TEST)
  glStencilFunc(GL_EQUAL, 1, 255.toUInt)

  f()

  rlDrawRenderBatchActive()
  //resetting things now we're done
  glDisable(GL_STENCIL_TEST)
  glClear(GL_STENCIL_BUFFER_BIT)
}

private def stencilMask(f: () => Unit): Unit = {
  glStencilOp(GL_REPLACE, GL_KEEP, GL_KEEP)

  f()

  rlDrawRenderBatchActive()
  glStencilOp(GL_KEEP, GL_KEEP, GL_KEEP)
}

//example psuedocode
stencilTest { () =>
  // create the bitmask
  stencilMask { () =>
    DrawTexture(...)
  }
  // Draw what you want to be masked
  DrawTexture(...)
}
I have a rough idea of what is going on with most of this. This is one of those libraries that started out feeling like witchcraft to me, and somehow I conjured the correct incantations to get the outcome I wanted.
Now I have a better grasp on the concepts (mainly from trying to write this appendix), so let's walk through a toy example to see what everything above is doing -
Imagine we have stencil buffer initialised to 0s:
(0,0,0,0,0,0,0,0,0,0,0,0,0,0,0,0)
When we enable Stencil Testing, we can manipulate the contents of the stencil buffer and use it to discard pixels from what we want to draw.
First we call glStencilFunc, which defines a test comparing a pixel in the texture to its corresponding value in the stencil buffer. We then try to draw our masking texture, and let's say it looks like this:
(_,_,_,_,0,1,0,1,0,1,0,1,_,_,_,_) //blank = no texture
Our test is very simple - it passes if and only if the value in the buffer is equal to 1. (The first arg of glStencilFunc is the comparison op to use, equal, the second is the reference value to compare against, 1.)
As the buffer is currently all 0s, the test fails for every pixel in the mask:
(_,_,_,_,f,f,f,f,f,f,f,f,_,_,_,_)
This also means nothing actually gets drawn from the mask.
The next operation, glStencilOp tells the engine how to update the stencil buffer based on the outcome of this test. The first argument determines what to do in the case that the Stencil Test fails (which it did for all pixels), and it means that we replace the stencil buffer value with the reference value, 1. So the buffer becomes:
(0,0,0,0,0,1,0,1,0,1,0,1,0,0,0,0)
We then reset glStencilOp to the default - keep everything in the buffer regardless of whether a test passes or fails.
Now we try to draw the thing we want to be masked, let's say the texture is all 1s:
(1,1,1,1,1,1,1,1,1,1,1,1,1,1,1,1)
Because we still have glStencilFunc set from before, we now get the following as the results of testing this second texture:
(f,f,f,f,f,p,f,p,f,p,f,p,f,f,f,f)
In other words, only the pixels of this texture that overlap with the masking texture pass the test and will get drawn to the screen.
We then reset the buffer for the next iteration, and disable Stencil Testing so no more writes to the buffer happen.
3: GLSL Fragment shader
In addition to the code above, we also apply a shader to complete the puddle effect. Here is the GLSL code I use:
#version 410 core

in vec2 fragTexCoord;

uniform sampler2D texture0;

void main()
{
    vec4 texelColor = texture(texture0, fragTexCoord);

    if (texelColor.a == 0.0) {
        discard;
    }
}
This is a fragment shader, which is the last part of the rendering pipeline that gets applied before any per-pixel processing is applied (things like the Stencil Test). The inputs to the program are declared up top. A fragment in our 2D context is a pixel, so as an input to this shader function we take the coordinates of a single pixel (in vec2 fragTexCoord). We declare that we are passing a 2D texture globally to the shader program with uniform sampler2D texture0. Then in the body of the function we extract the colour data for that fragment, and if its alpha value is 0, discard it.
We can add it to the stencil code from above like so:
def shaderMode(id: ShaderId)(f: => Unit): Unit = {
  // looks up the shader by id from a map we load at startup.
  // no need to do dynamic shader loader.
  val shader = get(id)
  // These are Raylib ops for applying the shaders
  BeginShaderMode(shader)
  f
  EndShaderMode()
}

//example psuedocode
stencilTest { () =>
  // create the bitmask
  stencilMask { () =>
    shaderMode(ALPHA_HOLE) { () =>
     DrawTexture(...)
    }
  }
  // Draw what you want to be masked
  DrawTexture(...)
}
-
The wikipedia page has a lot more information about what OpenGL actually is. ↩
-
A fun side-effect of writing this post was that I actually found I could massively simplify my OpenGL code for running the Stencil Test. ↩
-
The OpenGL rendering pipeline is a whole thing - read more about it here ↩